Let's try some French Pastry. It's not as hard as you may have heard, just follow the directions exactly, don't use any substitutions, and you will be just fine.
Today we will make a Strawberry Tart. It doesn't take a lot of work, but it does take time. I try to start early the day I want to eat it, or even the day before. But it is well worth it.
One of the first things you will need is a cute little French Pastry Chef to help you out.

First we will make the cookie part of the tart, called Pate Sable
Pate Sable
 1 cup all purpose flour
1/2 cup + 2 TBSP sugar*
1/2 cup (1 stick) unsalted butter,
chilled and cut into 1/2 inch pieces
1 egg yolk
1 TBSP cold water
 Pre heat oven to 350* F
Line 10 inch quich pan with circle of parchment paper;
set aside
if you don't have a quiche pan, use a straight sided cake pan or spring form pan
 I don't use my food processor for very many things
mostly because it is in the bottom cupboard and behind everything
and I don't like cleaning it. But I use it for this.
If you don't have a processor, use a pastry blender or two knives, like we did for pie crust and biscuts
 Combine flour, sugar and butter in processor and mix until consistency of coarse meal.
 Combine yolk and water in small bowl.
With machine running, add yolk mixture through feed tube and mix until dough begins to form ball.
 Roll dough between sheets of waxed paper into 10 inch circle.
If you wipe your counter just before you put your wax paper down, it will stick and not slip and slide all over the counter top.
Now, here is where pastry gets a bit tricky. Pastry does not like to be handled very much, but as you can see above, my pastry stuck to the wax paper. I didn't flour my paper, because too much flour makes pastry tough and hard and icky.
But because it stuck- probably the humidity in the air, it was raining- I did this instead
 I scraped it all off of the wax paper, formed a ball
and rolled it out with my small roller
 Here it is all rolled out
If I had rolled it with the wax paper, the instructions would say:
Roll dough between sheets of waxed paper into 10-inch circle. Remove top paper and invert pastry into quiche pan; peel off remaining paper.
 Prick pastry thoroughly with fork.
Bake until cookie is well browned, 15-20 minutes,
watching carefully after 15 minutes as it will darken quickly.
 I got the center a bit thinner than the rest, so it darkened faster than the outside.
Cool Completely
Pastry Cream:

 1 Cup Milk
3 egg yolks
1/4 cup sugar
2 1/2 TBSP all purpose flour
2 TBSP (1/4 stick) unsalted butter, room temperature
Bring Milk to boil in heavy 1 1/2 quart saucepan over medium heat.
 Meanwhile, combine yolks and sugar in small bowl and whisk to blend.
 Add flour and beat just until completely mixed
 When milk is boiling, gradually stir about 1/3 into yolk mixture
 Blend completely
 Pour back into saucepan and, whisking constantly, bring to boil over medium heat.
Reduce heat and whisk until mixture is thickened, about 2-3 minutes
 Remove from heat and blend in 2 TBSP butter with vanilla
 Pour into bowl and spread light film of butter completely over top,
 Up to 6 hours before serving, set cookie on serving plate
 Stir pastry cream with wooden spoon or rubber spatula until spreadable;

 Using brush, (or spoon) spread cream 1/8 inch thick over entire cookie
 Remove from heat and blend in 2 TBSP butter with vanilla
stirring until butter melts.
 Pour into bowl and spread light film of butter completely over top,
or set plastic wrap directly on surface (this prevents skin from
forming).
Refridgerate until chilled and firm
To Assemble:
 Up to 6 hours before serving, set cookie on serving plate
Using pastry brush, spread 1/4 cup butter liberally over top
(you may not need entire amount, but be sure to get butter in all fork holes to keep crust flaky
You may also use a spoon if you don't have a pastry brush)
 Stir pastry cream with wooden spoon or rubber spatula until spreadable;
do not use whisk or electric mixer or cream will thin and be runny

Put cream on cookie
 Using brush, (or spoon) spread cream 1/8 inch thick over entire cookie
Finishing
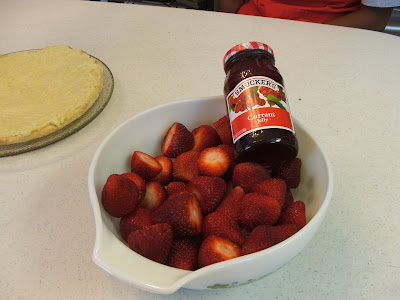 2 pints fresh strawberries, hulled
 Hull your strawberries
 2 pints fresh strawberries, hulled
2-3 oz currant jelly
Toasted sliced almonds(optional)
Powdered sugar(optional)
 Hull your strawberries
I have my assistant do this
 Place strawberries stem end down in concentric circles to cover top
 With all the strawberries
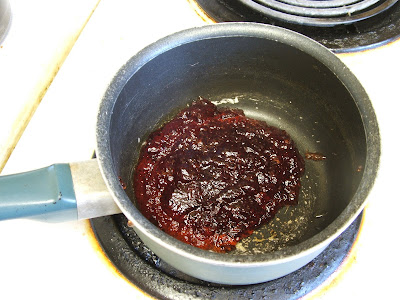 Press jelly through strainer into small saucepan to break up any lumps.
 Bring to boil over medium heat.
 Immediately brush over strawberries and outer edge of crust to glaze completely.
 You can use a spoon if you don't have a pastry brush
 With all of the jelly on it.
 But because I forgot to get almonds
 Place strawberries stem end down in concentric circles to cover top
 With all the strawberries
 Press jelly through strainer into small saucepan to break up any lumps.
 Bring to boil over medium heat.
 Immediately brush over strawberries and outer edge of crust to glaze completely.
 You can use a spoon if you don't have a pastry brush
 With all of the jelly on it.
If I had had some almonds, I would now
Place almonds over outer row of berries.
Set 7-inch circle of waxed paper over center of tart and
liberally sprinkle almonds with powdered sugar
Carefully remove paper and discard.
Refrigerate tart until ready to serve.
 But because I forgot to get almonds
I just sprinkled the whole thing with powdered sugar
Tart is very delicate. Be careful when moving it or cookie base might break.
Tart is very delicate. Be careful when moving it or cookie base might break.
*******************
Eat Well, Live Well
Eat Well, Live Well


 Enjoy a bowl of home made ice cream


